Software Alchemist

I am constantly seeking answers and ways of transforming desires into reality by coding

How I Built a Self-adaptive System

| Comments

Since the time I switched from web development and ecommerce as my main field of work to infrastructure development and cloud computing at Twilio, I haven’t been blogging much. This is not because I don’t have interesting topics to talk about, but rather the quantity and complexity of things I’m dealing with is overwhelming and takes most of my time.

I recently gave and internal talk on self-adaptive systems at Twilio which was quite well received and so I decided to post my thoughts to inspire more people out there to build these kinds of systems and, more importantly, frameworks for building them.

Adaptation in nature

Some of the greatest examples of adaptation come from nature. Systems like human body, colonies of ants and termites, flocks of birds, etc. are far more complex than any adaptive systems we have ever built to date. These systems are also decentralized and consist of a number of lower level primitive components, collaboration of which on a higher level produces very complex and intelligent behaviors.

Adaptation in nature is typically built around negative and positive feedback loops, where the former are designed to stop behavior, while the latter are there to re-encourage it. Ants, for example, when find food, leave a pheromone trail on their way back, letting other ants find their way to source of food. The more ants got food when following the scent, the stronger the path smells, attracting more ants to it. Similarly, when encountering a source of danger, another pheromone is produced to warn other ants of the danger ahead.

These systems are also distributed and unbelievably fault tolerant. When we catch a cold, our immune system redirects some of our body’s resources towards fighting the virus, while we can still remain operational for the most part. Certain types of sea-stars can even recover from being cut in half, yet software cannot recover from serious data loss and hardware won’t work when broken in halves.

Real world application at Twilio

This post is highly practical and is in fact a result of application of described model in a real world system at Twilio.
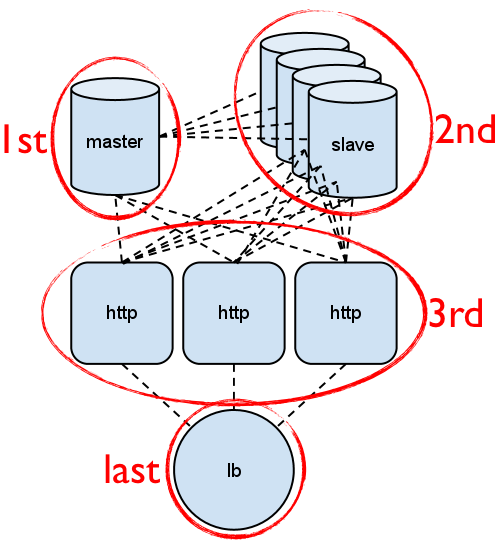
At Twilio I am in charge of an internal tool called BoxConfig. BoxConfig is an HTTP api for provisioning of cloud instances with a bunch of additional functionality, like keeping track of machine’s status, making sure it is monitored by nagios and gets traffic from internal load balancers depending on machine’s purpose.

Despite working with individual machine instances through a programmable API (and a nice HTML5 application that I built) being great, we needed a way to work with and manage sets of hosts with ease. We wanted to be able to define, what we call, a host group, consisting of a number of different host types and meaningful relationships between them. Such relationships would then let us determine the order we need to boot these hosts in and how to manage other aspects of their lifecycle.

Solution

While building a distributed asynchronous task queue with workflow primitives like task set and sequence seemed like a great solution for this problem at first, it was quickly discovered that computation of steps in advance is useless in case one of the hosts in a group gets shut down during boot, or in case a long running task gets killed. We needed a mechanism that would be able to periodically check state of a group and determine what to do. This is how my research in the field of adaptive systems and adaptation rules began. As a result of that research, I implemented such system and I’m hoping to create a framework for building these kinds of external or internal adaptation loops to make both new and existing systems out there capable of adaptation.

Rules engine and ECA

An important part of any adaptation is specifying adaptation rules. While in most biological systems all of those rules are written in cell’s DNA, for a software system I needed to find a good framework for defining those. I decided to stick with ECA (even condition action) rule structure, most known for being used in defining database triggers. The idea is that each rule consists of an action to be triggered on a certain event should an accompanying condition be satisfied.

1
2
3
4
5
6
7
8
9
10
11
12
13
14
When InActiveStartTransition
And StatusIsInit
Then IncrementBootNumberAndSetStatusToBootingUp

When InActiveStartTransition
And StatusIsBootingUp
And HostsAreRunningOutOfLoadBalancer
Then BringRunningHostsIntoLoadBalancer

When InActiveStartTransition
And StatusIsBootingUp
And NoExistingHostsAreBootingUpOrConfiguring
And MoreHostsCanBeBooted
Then BootMoreHosts

Above is a Ruby DSL I used for defining these rules. This DSL is capable of defining two types of rules - event rules, that can be explicitly triggered by an external event, and periodic checks, that are checked at each cycle of main control loop. What you see above are periodic rules, and an event rule would look like:

1
2
3
On Event
If Condition
Do Action

I also added some boolean logic primitives for combining and negating conditions to save me from explicitly writing all the possible condition combinations by reusing what I already have.

Each action and condition in my implementation is represented by Ruby classes that look like this:

1
2
3
4
5
6
7
class StatusIsInit < Boxconfig::API::Condition
  desc "group is in 'Init' status"

  def self.test(group)
    group.status == "Init"
  end
end
1
2
3
4
5
6
7
class SetStatusToConfigurationError < Boxconfig::API::Action
  desc "set status to 'Configuration Error'"

  def self.perform(group)
    group.status = "Configuration Error"
  end
end

As you can see, each condition and action have a description that accompanies them. These are used to log every decision that control loop takes during its lifetime. Every decision is displayed to the user and contains important information such as its timestamp, action taken, reason and trigger which will either be an event name or periodic check.
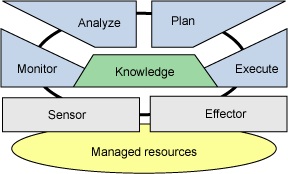
MAPE-K, originally described by IBM is a great model for thinking about and building such adaptation loops. It stands for Monitor, Analyze, Plan and Execute over a shared Knowledge base. While it is up to you how each of these components are going to be implemented and wether each part of such system is going to live in its own component at all, it provides enough instructions on how to think about externalizing such control mechanisms through building sensors and effectors into your controlled system. In my case, both sensors and effectors are part of BoxConfig’s HTTP API that lets control mechanism discover current state of a group and modify it.

Conclusion

While described system is in a very early prototype phase and the end framework I come up with might be very different, progress I made so far leads me to believe that such approach can be used to solve a variety of problems developers and system administrators are facing today. Not limited to:

  • Configuration management
  • Process monitoring and management
  • Intelligent deployment
  • Cluster auto-scaling and self-healing
  • Business rules enforcement and SLAs

I am currently in process of finding the best approach for implementing such a framework with a number of requirements in mind, most importantly - flexibility and ease of use.

AngularJS - Superheroic JavaScript MVC Framework

| Comments

I’ve been working both on frontend and server-side at Twilio. This has led to form my opinion that to make HTTP scale better, one shouldn’t use it to serve HTML at all. Rather, only serve data using HTTP and make it pretty on the client. In addition to offloading most of data processing to the client and making server lighter and less loaded, this decoupling achieves two important things:

  • Frontend code can live on a different cycle than your service code.
  • Perceived end user experience is a lot faster, since ongoing client/server communication is only about data exchange and not rendering logic.

Superheroic framework

There are a lot of JavaScript MVC frameworks out there nowadays. Why should you bother to learn yet another one. There are several reasons why I consider AngularJS to be a truly superheroic framework.

Testability

Testing done right is hard. I’ve always thought that the reason I haven’t seen appropriate testing was because I’d been using PHP and PHP is… oh, you know… Wrong! The reason I haven’t seen proper unit testing is because it is not widely used. Dependency injection allows for decoupled and unit-testable code, yet it is still largely misunderstood in Ruby and Python communities and they are just starting to get it. JavaScript is, naturally, no exception.

Well, good news, AngularJS is built by a team of really smart people, one of them, Miško Hevery, is a well-known test advocate, who has a series of Google Tech Talks on Unit-Testing, Clean coding and other interesting stuff that you should definitely check out. He also blogs about interesting programming related topics.

AngularJS comes with a built-in dependency injection framework and documentation has plenty of examples of writing unit, functional and end-to-end tests. Dependency injection container also allows for easy integration of 3rd party JavaScript into the framework, so all code feels at home.

AngularJS is an HTML pre-compiler, which means that your templates become really powerful and gain dynamic capabilities like conditionals and iterators, everything you expect from a server-side HTML framework. However, due to the nature of the environment AngularJS runs in, there is no need to pass data to templates, rather you work directly inside of your controller, assigning data (and functionality) to controller properties and your views get updated instantly - very useful feature if your data comes, for example, from an HTTP api.

Philosophy

AngularJS’s philosophy is enhancing HTML to what it should’ve been, had it been built with web applications in mind. This means that AngularJS templates use custom attributes, prefixed with ng: for adding dynamic capabilities. It seems a little unclean at first, but truly makes up for it with the speed that it lets you iterate on templates. And of course you can create your own ‘widgets’ (new HTML tags like <ng:switch></ng:switch>) and ‘directives’ (custom HTML attributes like ng:repeat). AngularJS literally re-compiles the DOM tree on initial page load to handle those. Ability to express your view logic using real markup code is indeed empowering.

Usage

In its simples setup, AngularJS does not require any manual initialization steps, except for including a script in a page and adding ng:autobind attribute to the <script/> tag. Manual initialization is still possible.

As I mentioned before, AngularJS let’s you set up custom directives and widgets. Couple of the ones that I have are:

  • ng:sort - a directive I use on table header fields to set up sorting
1
<th ng:sort="name">Name</th>
  • ng:timeago - a widget that displays a date in time ago format
1
<ng:timeago from="Mon, 27 Feb 2012 15:28:53 -0800"></ng:timeago>

In addition to markup extensions, you get ability to create custom services, that can be injected in your controllers, directives and widgets. This lets you re-use even more code and separate concerns better. Some services that I created for my UI are various HTTP Clients and Notifiers.

Controllers, this is where you start developing AngularJS application and, depending on how large that application is going to be, this might be the only place you need to know about. Controller in AngularJS is just a regular JS object (one of the things I love about AngularJS is that you don’t need to extend anything… ever… I dislike inheritance for reasons I stated in earlier posts). You can have some initialization logic in its constructor and you can inject some services in it using provided injection api.

1
2
3
4
MainController.$inject = ['api', '$location'];
function MainController(api, $location) {
  // code goes here...
}

The above example would tell AngularJS to inject ‘api’ and ‘$location’ services to my MainController upon initialization.

Finally, you initialize your template to use some controller:

1
2
3
4
5
6
7
8
9
10
11
12
13
14
15
16
<!doctype html>
<!--[if lt IE 7]><html class="no-js ie6 oldie" lang="en" xmlns:ng="http://angularjs.org/"><![endif]-->
<!--[if IE 7]><html class="no-js ie7 oldie" lang="en" xmlns:ng="http://angularjs.org/"><![endif]-->
<!--[if IE 8]><html class="no-js ie8 oldie" lang="en" xmlns:ng="http://angularjs.org/"><![endif]-->
<!--[if gt IE 8]><!--><html class="no-js" lang="en" xmlns:ng="http://angularjs.org/"><!--<![endif]-->
<head>
  <title>Page Title</title>
</head>
<body ng:controller="MainController">
  <!--
    markup goes here
  -->

  <!-- AngularJS -->
  <script src="js/libs/angular-0.9.19.min.js" ng:autobind></script>
</body>

Advanced usage scenarios like multiple pages are also supported using ng:view widget and $route service. AngularJS lets you register controller/template combinations on various routes for those use cases.

Be a superhero

AngularJS makes building interactive web-apps a task even such a front-end newbie like myself can handle and make colleagues go ‘wow!’. I definitely recommend using it as tools it provides let a project grow and stay decoupled and simple, which I feel is a problem that hasn’t been solved properly (until now that is). AngularJS is on GitHub and accepts contributions in a healthy cycle, so if you want to go beyond just using this brilliant framework, you can definitely leave your mark in its codebase.

Interacting With ZeroMQ From the Browser

| Comments

Interacting with ZeroMQ from the browser is the talk me and my co-worker Jeff Lindsay gave at ZeroMQ conference in Portland, OR. We’ve missed our flight the night before and I started writing this post while we had been sitting at the gate, waiting for unclaimed seats on the next available flight.

Fixing the world

“World is broken” is the reason ZeroMQ exists, it is there because networking has been unnecessarily hard and had to be fixed. ZeroMQ’s philosophy is about modularity and reusability, it promotes creation and use of sockets, networking primitives, that do just one thing and do it well, to compose more complex communication patterns that are simple to think about and communicate.

ZeroMQ in the browser

Design and philosophy of ZeroMQ alone is incredibly useful and opens up mind to new ways of thinking about and solving networking problems. From this point of view, ZeroMQ’s actual C library (libzmq) is just an implementation detail. Imagine taking same networking primitives ZeroMQ introduces and solving web related problems with them. NullMQ is taking concepts ZeroMQ introduced and applying them in a different environment. This new environment has a different set of constraints, yet similar requirements of solving communication by reusing basic primitives.

NullMQ gives you the same six socket types to be used in the browser. Browser environment is different from private networks. Additional constraints like authentication, authorization, limited number of connections and speed are added. NullMQ operates over WebSockets and has its own communication protocol based on STOMP. NullMQ to STOMP is like WebDav to HTTP. It is therefore server implementation agnostic. NullMQ context, once instantiated, lets you create same socket types as regular ZeroMQ context. It won’t open new connection per each socket however and will instead handle multiplexing of connections,so you get multiple virtual connections, all using one real connection underneath. Having ZeroMQ semantics available in the browser is powerful, because it lets you solve a networking problem by designing appropriate communication pattern from scratch, without being constrained by various browser or server networking specifics, and re-use it in both environments.

NullMQ in action

For our NullMQ demo I build chat and presence servers and clients. For both problems, I used clone pattern from ZeroMQ guide. Server in clone pattern consists of three different sockets, PUB - which is used to publish state updates to all subscribed clients, PULL - which each individual client pushes its state changes to, and which server ultimately ends up publishing to all clients and, finally, ROUTER - which is used to answer client requests to get server’s current absolute state. Client also has three sockets, which are almost exact opposites of server’s socket set. When client first starts, it uses a SUB socket to subscribe to all state changes that a server will publish, immediately after that, it creates a REQ socket to get server’s current absolute state which it will then remember and apply published updates to to stay in sync, and, finally it uses a PUSH socket to send it’s own state changes back to the server.

This pattern solves both a chat and a presence use case. In case of a chat, a clients connects, subscribes to new messages and requests all messages previously published to the server. Whenever user sends a message, it pushes them back to the server, server publishes this message to all clients and it ends up on user’s screen. In case of a presence server, client connects, subscribes to peers’ state updates from the server, requests a list of all peers, which is a list of names and online statuses and starts pushing periodic heartbeat. In my case, it specifies heartbeat timeout in every heartbeat message and server constantly looks at a list of registered clients, checks when the last heartbeat for each client was received and compares it to a timeout that client send out. If more time has passed since the last heartbeat than was specified as timeout, it decides the client is offline and publishes that to others.

Client and server for both use cases had been implemented in Ruby, using ZeroMQ bindings for Ruby. And this is where NullMQ comes into the picture. I created two more clients for my presence and chat servers, this time in javascript in the browser, using NullMQ. It was surprisingly straight forward and code was almost identical in JavaScript and Ruby.

1
2
3
4
5
6
7
8
9
10
11
12
13
14
15
16
17
18
19
20
21
22
23
24
25
26
27
28
29
30
31
32
33
34
35
36
37
38
39
40
41
42
43
44
45
46
47
48
49
require "ffi-rzmq"
require "clone"
require "json"

@peers = {}
@name = ARGV[0]
@text = ARGV[1]

client = Clone::Client.new(ZMQ::Context.new(1), {
  :subscribe => "tcp://localhost:10001",
  :request   => "tcp://localhost:10002",
  :push      => "tcp://localhost:10003"
})

client.on_response do |payload|
  begin
    peers = JSON.parse(payload)
    peers.each do |name, peer|
      @peers[name] = peer
    end
  rescue JSON::ParserError
  end
end

client.on_publish do |payload|
  begin
    peer = JSON.parse(payload)
    @peers[peer['name']] ||= {}
    @peers[peer['name']].merge!(peer)
  rescue JSON::ParserError
  end
end

begin
  $stdout << "connecting...\r\n"
  client.connect
  loop do
    client.push(JSON.generate({
      "name" => @name,
      "text" => @text,
      "online" => true,
      "timeout" => 2
    }))
    sleep(1)
  end
rescue Interrupt
  $stdout << "disconnecting...\r\n"
  client.disconnect
end
1
2
3
4
5
6
7
8
9
10
11
12
13
14
15
16
17
18
19
20
21
22
23
24
25
26
27
28
29
30
31
32
33
34
35
this.presenceClient = new Client({
    subscribe: "tcp://localhost:10001"
  , request:   "tcp://localhost:10002"
  , push:      "tcp://localhost:10003"
});

this.presenceClient.onResponse = function(payload) {
  Object.merge(this.peers, JSON.parse(payload));
  $updateView();
}.bind(this);

this.presenceClient.onPublish = function(payload) {
  var peer = JSON.parse(payload);
  this.peers[peer['name']] = this.peers[peer['name']] || {}
  Object.merge(this.peers[peer['name']], peer);
  $updateView();
}.bind(this);

var interval;

this.presenceClient.onConnect = function() {
  interval = setInterval(function() {
    this.presenceClient.push(JSON.stringify({
        name: this.name
      , online: true
      , text: this.text
      , timeout: 2
    }));
  }.bind(this), 1000);
}.bind(this);

this.presenceClient.onDisconnect = function() {
  clearInterval(interval);
  this.peers = {};
}.bind(this);

To connect NullMQ clients to ZeroMQ servers, I wrote a WebSocket bridge implementation in Python. It uses ws4py and stomp4py for NullMQ frame processing. When NullMQ JavaScript clients call connect on a socket and pass endpoint URI, the WebSocket Python bridge actually creates a real TCP connection to ZeroMQ Ruby server. Data from JavaScript to bridge is sent over a single WebSocket connection per NullMQ context instance (I had two contexts total in this case - one for chat and one for presence clients), which multiplexes messages from different sockets (three sockets per each client). This data is then processed and outgoing messages are forwarded through real TCP links from bridge to presence and chat servers. Messages from server to bridge are multiplexed back to JavaScript sockets over WebSocket connection.

The joy of realtime

When I finished writing the bridge and started the whole thing I was immediately blown away. Being able to see other clients coming online and getting messages is pure joy, you can’t stop smiling. The whole thing took about 3 days of work, which is amazing considering that I used three various languages, one of them for the first time (Python), two libraries I have almost no experience with, and all clients had almost exactly same code (Javascript and Ruby). I could potentially write clients in any language I wanted (ObjectiveC for iPhone app, Java for Android and etc.) and it really feels like there is no limit to what can be built on top of this. For this demo I haven’t implemented advanced clone pattern features like numbered updates and automatic synchronization, but it is really not hard to do and I might just throw it in there.

Conclusion

While being a great networking library, ZeroMQ is more than that, it is a networking philosophy and a great source of recipes for common problems. NullMQ proves that this philosophy and knowledge is not limited to traditional, private networking, but also weird, limited control places like web browsers. So take it for a spin and let me know how it goes.

P.S. all sources for our presence and chat demo are available on github, just follow the docs in each directory to be able to run it locally.

Cross Domain Javascript, Lessons Learned

| Comments

Since the time I’ve started at Twilio, I’ve been tasked with improving a web user interface of one of the internal services.The service consists of a REST API that is used by the web UI and a number of other clients. To better separate concerns, I’ve decided to build the UI as an HTML5 application communicating directly to the REST API and since I wanted to develop locally, without having to run my version of the API, I decided to enhance it a bit to make it Cross-Origin Resource Sharing specification (CORS) complaint. This post is my practical overview of CORS.

note The techniques described in this blog post won’t work with older browsers. All versions Opera browser specifically don’t support CORS.

Simple CORS communication

Let’s assume that our web UI is running on localhost and our API is served from api.example.com.

When browser sends request to a different origin, it adds the Origin header like so:

GET / HTTP/1.1
Host: api.example.com
Accept: text/html
User-Agent: Mozilla/5.0 (Macintosh)
Origin: localhost

The server then needs to add Access-Control-Allow-Origin header so the response might look like:

HTTP/1.1 200 OK
Date: Sat, 02 Apr 2011 21:05:05 GMT
Content-Type: text/html
Access-Control-Allow-Origin: localhost

<html>
  <!-- HTML -->
</html>

The fact that the value for the Access-Control-Allow-Origin header of the response matches value the browser sent in Origin header as part of the request tells it that it is safe to display the content.

With me so far?

Non-simple request methods with CORS

This communication is quite simple and easy to follow. Things get a little more complicated once we want to send requests using non-simple method - anything other than POST or GET. Let’s assume that we want to execute PUT /posts/1.

First, the browser sends a so-called “pre-flight” request to the API using OPTIONS HTTP method:

OPTIONS /posts/1 HTTP/1.1
Host: api.example.com
User-Agent: Mozilla/5.0 (Macintosh)
Origin: localhost

In order for the communication to continue, the server, in addition to already mentioned Access-Control-Allow-Origin, needs to respond with Access-Control-Allow-Methods header, which is an equivalent of the regular Allow header. Here is how it might look:

HTTP/1.1 200 OK
Date: Sat, 02 Apr 2011 21:05:05 GMT
Allow: GET, PUT, DELETE
Access-Control-Allow-Origin: localhost
Access-Control-Allow-Methods: GET, PUT, DELETE

note Server doesn’t allow POSTing to our imaginary post instance resource.

After that, only if the original request method it listed in the Access-Control-Allow-Methods header of the response will the browser continue to execute the original request:

PUT /posts/1 HTTP/1.1
Host: api.example.com
Accept: text/html
User-Agent: Mozilla/5.0 (Macintosh)
Origin: localhost

title=First%20Post&author=Bulat&body=Hello%20World!

Finally, the server responds with:

HTTP/1.1 200 OK
Date: Sat, 02 Apr 2011 21:05:05 GMT
Content-Type: text/html
Access-Control-Allow-Origin: localhost

<html>
  <!-- HTML -->
</html>

note Server can use the Access-Control-Max-Age header to tell the browser to send non-simple method requests without pre-flight request for a certain number of seconds.

Everything is still fairly straightforward and consistent across all browsers until this point.

CORS with Basic Auth

Now another important point is that the API of the service my web application is going to talk is enforcing HTTP Basic Auth. The communication workflow changes a little bit in that case.

As usual, browser requests a resource on a different domain:

GET / HTTP/1.1
Host: api.example.com
Accept: text/html
User-Agent: Mozilla/5.0 (Macintosh)
Origin: localhost

Server responds with already discussed Access-Control-Allow-Origin, additionally server sends Access-Control-Allow-Credentials header and Basic Authentication requirement:

HTTP/1.1 401 Authorization Required
Date: Sat, 02 Apr 2011 21:05:05 GMT
Content-Type: text/html
Access-Control-Allow-Origin: localhost
Access-Control-Allow-Credentials: true
WWW-Authenticate: Basic realm="Secure Area"

<html>
  <!-- HTML -->
</html>

note Please make sure to set withCredentials flag to true when sending ajax request. Here is how you would do it with jQuery:

1
2
3
4
5
6
$.ajax({
    url: 'http://api.example.com/'
  , xhrFields: {
      withCredentials: true
    }
});

Now if you are using a modern version of firefox, you should be prompted with standard Basic Authentication popup in your main window.

Once you’ve submitted the credentials and they’ve been verified by the server, communication continues as usual.

CORS Basic Auth gotchas

Using Basic Authentication with CORS specification means that you need to prompt authentication popup sent by the server to users of your application.

This works as is in Firefox, however Safari won’t show Basic Auth popup from different domain as a result of XMLHttpRequest. You can get around that by inserting a hidden <iframe/> element linking to the protected url. This will trigger the authentication popup and once the user has authenticated, you can execute direct XMLHttpRequests as usual.

Chrome prevents basic authentication from a different origin as a phishing attack period. The only way to get around that is to redirect your user to the target url and ask them to come back once authenticated. After the authentication is complete, communication can continue normally.

Conclusion

CORS specification is incredibly valuable when designing HTML5 applications that can talk to well defined HTTP APIs.

Cheers!

Useful reading

About ‘Rel’ Attribute From a Web Developer’s Point of View

| Comments

This blog post is about my understanding of the versioning aspect of true RESTful APIs, or as I’m going to refer to them further, Hypermedia APIs, and how link context, and rel attribute in particular, lets you get away without versioning your API while keeping clients from breaking. The rest of this post is going to assume that you are familiar with Richardson Maturity Model and modern MVC frameworks like Symfony2 or Rails.

The routing component of such frameworks serves a double purpose:

  • First and foremost, it lets framework users handle different URIs by routing them to various controller actions.
  • Secondly, and what is more relevant to this blog post, routing lets framework users create route aliases and then use them to generate links in the view.

For example, if we defined a route called ‘home’ for URI ‘/’, we could then generate it in the view with something like:

1
<a href="<?php echo $router->generate("home"); ?>">Home</a>

This proves to be incredibly useful when you change the actual URIs of each route since you don’t have to modify the views later.

From the API design point of view, when links contain ‘rel’ attribute:

1
<link href="/" rel="home" />

Hypermedia clients don’t need to know about the actual URI for ‘home’ resource, hence that URI can be changed without the need of modifying the client, just like you won’t break your website by changing URIs of some controller actions when using a modern framework. Additionally, you don’t need to version your websites because the link to ‘home’ is now linking to ‘/index’ instead of ‘/’.

By the way, when designing websites, we provide context to our users by putting text ‘Home’ inside the ‘a’ tag in the website navigation, to let them know what the hyperlink is for and not where it is linking to, which changes less frequently:

1
<a href="/index">Home</a>

Say good bye to versioned “RESTful” APIs, and welcome discoverable hypermedia APIs!

Cheers!

P.S. You could even use your real route names, the ones you define in your favorite framework, as values for ‘rel’ attributes of your links. Additionally, to make ‘rel’ attribute even more useful, you could structure your ‘rel’ attributes like URIs:

1
<link href="/" rel="/rels/index" />

You could then use ‘rel’ attribute URIs to provide documentation for the appropriate resource, e.g. docs for root resource would live under ‘/rels/index’. Finally, ‘/rels’ could be used to list all available documentation. This should enable users to find documentation for your API by interacting with it.

Thank You OpenSky and Farewell

| Comments

Working at OpenSky has been a rewarding and exciting experience, I’ve met developers from around the world, attended conferences (even got to speak at one), helped build open source software and have seen others consider my contributions valuable. However, the following two weeks are gonna be my last two weeks at OpenSky, after which I’m moving to San Francisco to join Twilio. This post is a recap of my days at OpenSky and thoughts that pushed me to make this decision.

I’ve started at OpenSky mid August 2009, almost two years ago. At that time the company had a total of about ten employees, with a technology department consisting of two people, including an enthusiastic CTO and a bright software engineer. I was the second software engineer hired at OpenSky which allowed me to see the company grow from its infancy and take part in most of the technical decisions made here. A position at a young and promising startup one can only dream of.

Follow your dreams, because life is too short

John Caplan CEO and Co-founder of OpenSky

During these two years OpenSky survived an office move, several system re-builds, one major pivot and two CTOs and is now growing more rapidly than ever before. We have about fifty in-house employees and the technology team grew from four to over a dozen engineers and sys ops workers. In addition, OpenSky has a product team of almost the same size, that consists of great product managers, a creative director and several front end and interaction designers. The revenue and member numbers have been growing exponentially every month after the latest re-launch in April, showing the true potential of the company.

OpenSky is the most successful company and the smartest team (engineering, product and business) that I have ever been a part of.

I was always comfortable here. I’ve been lucky enough to spend a lot of time working with different open source ecommerce systems, studied how they solved similar problems and got to pick solutions that worked best for me even prior to joining the company. In fact, almost all websites I’ve worked on professionally (for money) were ecommerce related and since I’ve had experience building these before I started at OpenSky, most of the problems I’ve been solving there I already have solved or have seen solved somewhere else.

PHP has been my tool of choice as its ability to solve a great number of web-related problems is still unmatched. Thanks to OpenSky’s modern approach to software development and my obsession with programming I’ve come to learn what clean code looked like, at least in PHP, practiced Test Driven Development and got involved in the open source community. We always worked with the best tools available at the time, even if their stability or completeness were yet to be proved. We thought that it was better to start with something promising that we could help grow instead of forcing ourselves into tools we had already learned were limited. That was overwhelming at times and I appreciate the trust and support the management has shown us during those periods, those were very exciting times otherwise. Most of the tools we use now are either stable or close to it, and the sense of innovation for me is gone. As someone said if you understand what you’re doing, you’re not learning anything. So here I am, with more than four years of experience of building small to medium ecommerce systems in PHP, building, although the most successful so far, yet another ecommerce system. Comfort is the word that describes my current situation best. And comfort is something I feel I’m too young to stop at. I need challenge and since PHP is widely used to solve a rather narrow set of problems, I realize how much of the computer science fundamentals (algorithms and data structures, memory management, processes, threads, locks, networks) I’ve never had to deal with.

There is a great idea expressed in Chad Fowler’s “Passionate Programmer” - one should always try to work in a team where he is the worst member. This doesn’t mean that you need to be dumb or not passionate about what you do, rather - try to work among people more talented and experienced than yourself. In other words, to become a better chess player one should play with a more skilled opponent.

When it comes to challenge Twilio is a unique company. It is the only company I know of, that provides telecommunications (voice and sms) as a service. The initial version of Twilio’s product was built entirely in PHP by the company’s CEO and co-founder, Jeff Lawson, and the majority of that code is still in use. As a result, it has complex architecture, uses a variety of technologies for a large set of different and rare problems and has a brilliant team of engineers, experienced in scalability, networks, databases and api design.

We’ve been through a lot together, me and OpenSky, and that our affair ends is sad. However, my dream of becoming one of the world’s most knowledgeable people in software development is awaiting and I’m quite confident Twilio will bring it even closer to reality.

Until next time, Bulat

How to Write Clean Code

| Comments

Boy, it’s been a while since my last post. I haven’t been blogging partially because I had nothing to say and partially because I had no time. This post will hopefully break the silence and at the same time be useful to my fellow PHP developers out there.

I’ve been talking about clean code and testability for quite some time now. It is simply impossible to cover all the techniques and explain them to a new audience in 40-some minutes during a meetup or a conference.

In this post I will share some of the techniques I use when designing code-bases of open-source libraries that I’m working on and how I think the design I chose helps others to keep their code clean and testable. This post was prompted as sort of a followup to discussions like the one we had on Symfony2 dev mailing list recently. Here I want to state my opinion and provide reasoning for what its worth.

Start with final classes:

When coding a class, I usually use TDD, meaning I write the test for my class before the actual implementation. At that point I usually have no idea how that class is going to look like, what public API (unless I have already partially discovered it from testing another class) it is going to have, which role in the class hierarchy it will take and whether it will have one at all. So, I start out by declaring the class as final, and use private properties and methods, because at that point, that class is final and not part of any inheritance trees.

This both keeps me from extending the class myself later on by also forcing me to think about how I want the class to be extended.

Mock or Stub by Interface:

During the coding of my class, I start seeing some of its dependencies and what they should be doing. At this point I don’t want to code real classes of my object collaborators yet, but I need those collaborators at the same time. So I create an interface for my future collaborator and mock it in the test.

The reason I advice mocking interfaces is simple - concrete classes can be final or can have some of their methods declared as final, at which point mocking is impossible. As we know, an interface in PHP (and in OOP in general) is a contract for classes that are going to implement it, as well as for classes that are going to collaborate with it’s implementations by type-hinting their methods. I think it makes sense to use such contract in cases where you want to replace actual class instance with a test double (be it a stub or mock), since no matter which one you chose, it is going to be an alternative implementation of the real object that needs to follow the same contract. Also keep in mind, that some language specifics in PHP encourages you to use interfaces.

note A mock in PHP should conform to the type-hint of the class being mocked, to achieve the mimicking of that class. Internally, PHPUnit generates a new class with obfuscated name, that extends or implements the class or interface being mocked accordingly. Hence, if the class-to-be-mocked has final methods, they won’t get overloaded in the mock, which may lead to unexpected behavior in tests. Even if the concrete class changes some methods to final later on, the tests that were once working will start breaking while no real public API changes occurred.

Refactor to inheritance:

Starting with final classes is important, because it forces us to make an extra step on our way to inheritance and there is a reason I want that step. Inheritance is very a useful and powerful feature of OOP (I feel like I’ve heard these exact words hundreds of times already) and I am not trying to de-value it. When it comes to programming, inheritance is a way to extend code by adding custom behavior to the child classes, without re-implementing what is already working in the parent, which is great and helps code-reuse a lot.

However. In languages like PHP, where we, poor developers, don’t have the means of horizontal code-reuse (yet?) like mixins or multiple inheritance, extending one class also means that it will not be possible to extend another. I personally feel that a decision like this is very serious and try to defer the need of making one until I know more about the system I’m building and the problem I’m solving. Programmers might find themselves in the middle of interesting problems if that principle is not followed.

Typically that means, that when I finally do extend some class:

  • I have an interface that I need to conform to
  • Classes at the bottom of my hierarchy are typically final
  • Classes at the top of the hierarchy are usually abstract
  • Most of the class members are private
  • Only methods and properties that need to be extended are protected

For every class operating on internal collaborators there has to be an interface:

The statement above might not be clear to everyone, so before justifying it, let me be clear on what I mean.

Assume you have a library that sends emails (SwiftMailer). That library has the Mailer class and Transport classes. The Mailer class can be configured with a Transport of choice (think SMTP, SendMail, etc.). What I mean is that the Mailer class should have a MailerInterface that it implements, because the class itself relies on collaborators to work. At the same time classes that are responsible for only tracking their internal state like value objects or PHP’s DateTime don’t need an interface.

The rationale here is simple - whenever I need to test a class that collaborates with Mailer, I don’t want to spend time on complicated setup of the Mailer object. Instead, I want to mock it and tell the object how it should behave in the test. The presence of the interface makes is that much simpler.

For every class that will be used in user-land code there must be an interface:

The rationale here is also somewhat simple: let’s be kind to other developers, and provide them a shortcut to stub or mock our library classes they will have to interact with directly from the classes they own, without having to worry about complicated setups in tests.

Every part of the library that can be extended must have an Interface:

If a user wants to provide alternative implementation of some class and the library is designed to allow that, there must be an interface that the user class can implement. In case of SwiftMailer, that means a TransportInterface to let us provide alternative email transportation means.

note Even if you designed an abstract class that needs to be extended, there should be an interface that lets users of the library write their own implementation from scratch. While an Interface is a contract, an Abstract Class is a suggestion and should not be considered a contract on its own.

Don’t force users of your library to use static methods:

I feel static methods are probably one of the biggest lies in OOP. They give you a sense of object oriented design, while they really are functions that live in global space, that cannot be encapsulated or replaced with test implementations if used inside objects and lead to all sorts of problems. There, I said it. Now let me try to explain myself.

When one calls a static method, it looks like Class::method(), that means that our code is all of a sudden dependent on the class Class (I know…), which, despite of all of our interfaces and best practices, binds us to a concrete implementation and most importantly, denies us from checking that our code actually calls this method internally while testing (unless we modify state from inside the static method itself, which is asking for even more trouble).

There is a good summary of the reasons static methods kill testability on Miško Hevery’s blog.

Conclusion:

When designing a system, especially the one to be used by others, one should concentrate on extensibility and flexibility. When I say extensibility, I don’t mean “leave all your classes open to inheritance, use protected properties everywhere, so that any class could be extended and changed to the core”. In fact, a technique like that kills flexibility on the side of library developers and maintainers by making refactoring impossible.

Extensibility means “let the system be extended to perform more than what it can initially”, but there are many means of doing it, composition and dependency injection being the most powerful ones. A well-designed system will result in stable API that can be extended over time without worrying about backwards compatibility (BC) breaks, just like the open/closed principle suggests, by making no changes to the core class and extending or decorating it to achieve more.

note A “refactoring” that breaks BC, could not be considered such, as refactoring by definition is … changing source code without modifying external behavior to improve code-reuse and design. Code that is used by end-users can be considered public.

note Dependency Injection means the user injects the dependencies in the setup part of the application, it definitely does not mean the user can pull in or suck in the dependencies by having a service lookup (that pattern would be probably called Dependency Sucking). In dependency injection you only pass around what’s needed and not shove all objects into some kind of service locator class (think Registry) and let other classes extract what they need. One of the advantages of DI is the fact that by re-assembling the system components, we can achieve different behavior for the end system, this advantage is lost with service lookups hard-coded in concrete classes. I feel that the clarification is important as even some of the most well-known PHP-ers can mix the terms sometimes, let alone everyone else.

Happy coding!

Using Nginx With PHP 5.3.3 on Windows

| Comments

This post is mainly a reminder to my future self in case I need to do something like this again.

Using bleeding edge technologies on Windows has always been a painful process. Mainly because not many LAMP developers use windows (its just not in the acronym), which leads to poor support of the OS and lack of learning material.

After playing with NodeJS and watching Ryan’s presentation, I realized all the drawbacks of Apache - my default web server for many years - and decided to give ngninx a shot.

  • Download and install a copy of the most recent php version for windows (PHP 5.3.3). Please note, that since we’re not gonna be using Apache, you can download the non tread safe version compiled with VC9.
  • The second step is to get nginx executable in the download section of nginx website. On Windows its as simple as unzipping the file into c:\nginx directory.
  • After that is done, we need to configure it to work with PHP. To do that let’s open c:\nginx\conf\nginx.conf and create the following server config:
1
2
3
4
5
6
7
8
9
10
11
12
13
14
15
16
17
18
19
20
21
22
23
24
25
26
27
28
29
30
31
32
33
34
35
36
37
38
39
server {
    listen       80;
    server_name  your_app.lcl;

    #charset koi8-r;

    access_log  logs/your_app.lcl.access.log  main;

    location / {
        root   c:\www\path\to\your\website;
        index  index.php;
    }

    #error_page  404              /404.html;

    # redirect server error pages to the static page /50x.html
    #
    error_page   500 502 503 504  /50x.html;
    location = /50x.html {
        root    c:\www\path\to\your\website;
    }

    # pass the PHP scripts to FastCGI server listening on 127.0.0.1:9000
    #
    location ~ \.php(/.*)?$ {
        root           c:\www\path\to\your\website;
        fastcgi_pass   127.0.0.1:9000;
        fastcgi_index  index.php;
        fastcgi_param  SCRIPT_FILENAME  c:\www\path\to\your\website\web$fastcgi_script_name;
        include        fastcgi_params;
    }

    # deny access to .htaccess files, if Apache's document root
    # concurs with nginx's one
    #
    #location ~ /\.ht {
    #    deny  all;
    #}
}

The above config tells nginx that application on http://your_app.lcl/ is located at c:\www\path\to\your\website on your filesystem. Furthermore, it tells nginx that all *.php files need to be served through a fast_cgi server on port 9000. * Now that we configured nginx to use fast_cgi for *.php files, we need to start a fast cgi server daemon. From your windows console run C:\php\php-cgi.exe -b 127.0.0.1:9000, where C:\php is the php installation path. * You can access your application at http://your_app.lcl/ after starting the nginx process in c:\nginx\nginx.exe

Happy Coding!

Symfony2 Console Commands and DIC

| Comments

I personally feel that conventions should be best practices and not inevitable parts of frameworks. Conventions are good, but they kill testability. So while they can save you some time you would have had to spend on configuration otherwise, they also limit the granularity of your interfaces and break testability.

My recent example of not testable controllers and how it could have been fixed was very well received amongst fellow Symfony2 developers, so that gives me enough confidence to propose something else.

There is another major part of the framework that can hardly be tested as it relies on Symfony’s internals and cannot use DIC for own configuration. Console Commands. They are registered by manual scan of bundles’ Console directory. They therefore cannot be configured through DIC with all dependencies moved to their interface definition and just get the generic Container instance instead.

Or can they? The answer is: “Yes, they can”.

And it wouldn’t be a lot of work to switch that. All we need to do is register each command in DIC as a service, and use tags to specify that this service is a command:

1
2
3
4
5
6
7
8
9
10
11
12
13
14
15
16
17
18
19
20
21
22
23
24
25
26
27
28
29
30
31
32
33
34
35
36
37
<?xml version="1.0" ?>

<container xmlns="http://www.symfony-project.org/schema/dic/services"
    xmlns:xsi="http://www.w3.org/2001/XMLSchema-instance"
    xsi:schemaLocation="http://www.symfony-project.org/schema/dic/services http://www.symfony-project.org/schema/dic/services/services-1.0.xsd">

    <parameters>
        <parameter key="console.command.assets_install.class">Symfony\Bundle\FrameworkBundle\Command\AssetsInstallCommand</parameter>
        <parameter key="console.command.init_bundle.class">Symfony\Bundle\FrameworkBundle\Command\InitBundleCommand</parameter>
        <parameter key="console.command.router_debug.class">Symfony\Bundle\FrameworkBundle\Command\RouterDebugCommand</parameter>
        <parameter key="console.command.router_apache_dumper.class">Symfony\Bundle\FrameworkBundle\Command\RouterApacheDumperCommand</parameter>
    </parameters>

    <services>
        <service id="console.command.assets_install" class="%console.command.assets_install.class%">
            <tag name="console.command" />
            <call method="setKernel">
                <argument type="service" id="kernel">
            </call>
            <call method="setFilesystem">
                <service class="Symfony\Bundle\FrameworkBundle\Util\Filesystem" shared="false">
            </call>
        </service>

        <service id="console.command.init_bundle" class="%console.command.init_bundle.class%">
            <tag name="console.command" />
        </service>

        <service id="console.command.router_debug" class="%console.command.router_debug.class%">
            <tag name="console.command" />
        </service>

        <service id="console.command.router_apache_dumper" class="%console.command.router_apache_dumper.class%">
            <tag name="console.command" />
        </service>
    </services>
</container>

Let’s look at how we could then test one of the least testable Symfony2 commands - the Symfony\Bundle\FrameworkBundle\Command\AssetsInstallCommand. This command copies public assets like JavaScript and CSS files from the bundles’ Resources/public directories into a publicly accessible web directory, that is passed to it as the only parameter.

Since I’m gonna be testing the already existing class, the test will not be as elegant as it could have been:

1
2
3
4
5
6
7
8
9
10
11
12
13
14
15
16
17
18
19
20
21
22
23
24
25
26
27
28
29
30
31
32
33
34
35
36
37
38
39
40
41
42
43
44
45
46
47
48
49
50
51
52
53
54
55
56
57
58
59
60
61
62
63
64
65
66
67
68
69
70
71
72
73
74
75
76
77
78
79
80
81
82
83
84
85
86
87
88
89
90
91
92
93
94
95
<?php

namespace Symfony\Bundle\FrameworkBundle\Command;

use Symfony\Bundle\FrameworkBundle\Command\AssetsInstallCommand;
use Symfony\Component\Console\Input\ArrayInput;
use Symfony\Component\Console\Output\NullOutput;

/*
 * This file is part of the Symfony framework.
 *
 * (c) Fabien Potencier <fabien.potencier@symfony-project.com>
 *
 * This source file is subject to the MIT license that is bundled
 * with this source code in the file LICENSE.
 */

class AssetsInstallCommandTest extends \PHPUnit_Framework_TestCase
{

    /**
     * @covers Symfony\Bundle\FrameworkBundle\AssetsInstallCommand::execute()
     */
    public function testRun()
    {
        $originDir = __DIR__ . '/Resources/public';
        $targetDir = __DIR__ . '/bundles/test';

        $filesystem = $this->getMockFilesystem();
        $filesystem->expects($this->once())
            ->method('remove')
            ->with($targetDir)
        ;
        $filesystem->expects($this->once())
            ->method('mkdirs')
            ->with($targetDir, 0777)
        ;
        $filesystem->expects($this->once())
            ->method('mirror')
            ->with($originDir, $targetDir)
        ;

        $bundle = $this->getMockBundle();
        $bundle->expects($this->any())
            ->method('getName')
            ->will($this->returnValue('TestBundle'))
        ;
        $bundle->expects($this->once())
            ->method('getPath')
            ->will($this->returnValue(__DIR__))
        ;

        $kernel = $this->getMockKernel();
        $kernel->expects($this->once())
            ->method('getBundles')
            ->will($this->returnValue(array($bundle)))
        ;

        $command = new AssetsInstallCommand();
        $command->setKernel($kernel);
        $command->setFilesystem($filesystem);
        $command->run(new ArrayInput(array('target' => __DIR__)), new NullOutput());
    }

    /**
     * Gets Filesystem mock instance
     *
     * @return Symfony\Bundle\FrameworkBundle\Util\Filesystem
     */
    private function getMockFilesystem()
    {
        return $this->getMock('Symfony\Bundle\FrameworkBundle\Util\Filesystem', array(), array(), '', false, false);
    }

    /**
     * Gets Bundle mock instance
     *
     * @return Symfony\Component\HttpKernel\Bundle\Bundle
     */
    private function getMockBundle()
    {
        return $this->getMock('Symfony\Component\HttpKernel\Bundle\Bundle', array(), array(), '', false, false);
    }

    /**
     * Gets Kernel mock instance
     *
     * @return Symfony\Component\HttpKernel\Kernel
     */
    private function getMockKernel()
    {
        return $this->getMock('Symfony\Component\HttpKernel\Kernel', array(), array(), '', false, false);
    }

}

While writing this test, I found out the command wasn’t testable because of a hard-coded mkdir function call that I couldn’t mock out. In order to fix it, I found the already existent Symfony\Bundle\FrameworkBundle\Util\Filesystem::mkdirs() method that wraps it, and makes it mockable, which I then proceeded to use. The only other changes I had to introduce were - get rid of Container dependency, and add Symfony\Bundle\FrameworkBundle\Command\AssetsInstallCommand::setKernel() and Symfony\Bundle\FrameworkBundle\Command\AssetsInstallCommand::setFilesystem() methods for direct injection of primary dependencies.

So here it is - the modified AssetsInstallCommand, that is fully unit-tested:

1
2
3
4
5
6
7
8
9
10
11
12
13
14
15
16
17
18
19
20
21
22
23
24
25
26
27
28
29
30
31
32
33
34
35
36
37
38
39
40
41
42
43
44
45
46
47
48
49
50
51
52
53
54
55
56
57
58
59
60
61
62
63
64
65
66
67
68
69
70
71
72
73
74
75
76
77
78
79
80
81
82
83
84
85
86
87
88
89
90
91
92
93
94
95
96
97
98
99
100
101
102
103
104
105
106
107
<?php

namespace Symfony\Bundle\FrameworkBundle\Command;

use Symfony\Component\Console\Input\InputArgument;
use Symfony\Component\Console\Input\InputOption;
use Symfony\Component\Console\Input\InputInterface;
use Symfony\Component\Console\Output\OutputInterface;
use Symfony\Component\Console\Output\Output;
use Symfony\Bundle\FrameworkBundle\Util\Filesystem;
use Symfony\Component\HttpKernel\Kernel;
use Symfony\Component\Console\Command\Command as BaseCommand;

/*
 * This file is part of the Symfony framework.
 *
 * (c) Fabien Potencier <fabien.potencier@symfony-project.com>
 *
 * This source file is subject to the MIT license that is bundled
 * with this source code in the file LICENSE.
 */

/**
 * AssetsInstallCommand.
 *
 * @author     Fabien Potencier <fabien.potencier@symfony-project.com>
 */
class AssetsInstallCommand extends BaseCommand
{

    /**
     * Holds Kernel instance
     *
     * @var Symfony\Component\HttpKernel\Kernel
     */
    private $kernel;

    /**
     * Holds Filesystem instance
     *
     * @var Symfony\Bundle\FrameworkBundle\Util\Filesystem
     */
    private $filesystem;

    /**
     * Sets Kernel instance
     *
     * @param Symfony\Component\HttpKernel\Kernel $kernel
     */
    public function setKernel(Kernel $kernel)
    {
        $this->kernel = $kernel;
    }

    /**
     * Sets Filesystem instance
     *
     * @param Symfony\Bundle\FrameworkBundle\Util\Filesystem $fs
     */
    public function setFilesystem(Filesystem $fs)
    {
        $this->filesystem = $fs;
    }

    /**
     * @see Command
     */
    protected function configure()
    {
        $this
            ->setDefinition(array(
                new InputArgument('target', InputArgument::REQUIRED, 'The target directory'),
            ))
            ->addOption('symlink', null, InputOption::PARAMETER_NONE, 'Symlinks the assets instead of copying it')
            ->setName('assets:install')
        ;
    }

    /**
     * @see Command
     *
     * @throws \InvalidArgumentException When the target directory does not exist
     */
    protected function execute(InputInterface $input, OutputInterface $output)
    {
        if (!is_dir($input->getArgument('target'))) {
            throw new \InvalidArgumentException(sprintf('The target directory "%s" does not exist.', $input->getArgument('target')));
        }

        foreach ($this->kernel->getBundles() as $bundle) {
            if (is_dir($originDir = $bundle->getPath().'/Resources/public')) {
                $output->writeln(sprintf('Installing assets for <comment>%s\\%s</comment>', $bundle->getNamespacePrefix(), $bundle->getName()));

                $targetDir = $input->getArgument('target').'/bundles/'.preg_replace('/bundle$/', '', strtolower($bundle->getName()));

                $this->filesystem->remove($targetDir);

                if ($input->getOption('symlink')) {
                    $this->filesystem->symlink($originDir, $targetDir);
                } else {
                    $this->filesystem->mkdirs($targetDir, 0777);
                    $this->filesystem->mirror($originDir, $targetDir);
                }
            }
        }
    }
}

And here is the result of running it in PHPUnit:

1
2
3
4
5
6
7
$ phpunit.bat --bootstrap tests/bootstrap.php src/Symfony/Bundle/FrameworkBundle/Tests/Command/AssetInstallCommandTest.php
PHPUnit 3.5.0RC1 by Sebastian Bergmann.

.
Time: 0 seconds, Memory: 4.75MB

OK (1 test, 3 assertions)

Happy Coding!

P.S. While I was posting this, and embedding my thoughts in public gists, Kris Wallsmith suggested to use the tags to specify command names as well, which is a very interesting suggestion.

P.P.S. Henrik Bjørnskov was very happy when I shared this idea with him and contributed most of the initial implementation of this feature here

P.P.P.S Code that I provided in the post is available on my GitHub repository, and is built on top of Henrik’s efforts.

Symfony2 DIC Component Overview

| Comments

As some of you might know, the Symfony2 framework consists of two main ingredients:

  • Components
  • Bundles

The logical separation should be the following:

The Symfony Components are standalone and reusable PHP classes. With no pre-requisite, except for PHP, you can install them today, and start using them right away. Symfony Components Web Site

A Bundle is a structured set of files (PHP files, stylesheets, JavaScripts, images, etc.) that implements a single feature (a blog, a forum, …) and which can be easily shared with other developers. Symfony2 Documentation

Of course, there are different vendor libraries that Symfony2 uses, that are not Components or Bundles. Its important to remember, that in order to expose that functionality in your Symfony2 application and make it accessible, you have to create a Bundle. Its a good practice and an unwritten convention.

I think that the main reason for doing so is to avoid setting up third party libraries yourself and delegate that to Symfony2’s DIC component, which was built for that very purpose. This lets other developers overload some of your configuration, class names and parameters without modifying your core classes and breaking backwards compatibility.

DIC stands for Dependency Injection Container.

The main idea behind Dependency Injection Containers is to extract all the instantiation and wiring logic from your application into a well-tested dedicated component, avoiding the code duplication that inevitably happens if you’re practicing Dependency Injection and Testability without DIC. By removing all of the setup code, Symfony2 removes another possibility of error and lets you concentrate on your domain problems instead of object instantiation.

Each object in Symfony2 DIC is called a Service. Service is an instance of some Class, that is created either by direct instantiation using the new operator or using some other Service’s factory method, that gets certain dependencies injected into it as part of the instantiation process.

It is much easier to understand how services are configured by looking at an example configuration:

1
2
3
4
5
6
7
8
9
10
11
12
13
14
15
16
17
18
19
20
21
22
23
24
25
26
27
28
29
30
31
32
33
34
<?xml version="1.0" ?>

<container xmlns="http://www.symfony-project.org/schema/dic/services"
    xmlns:xsi="http://www.w3.org/2001/XMLSchema-instance"
    xsi:schemaLocation="http://www.symfony-project.org/schema/dic/services http://www.symfony-project.org/schema/dic/services/services-1.0.xsd">
    <parameters>
        <parameter key="payment_gateway.adapter.paypal.username">API_USERNAME</parameter>
        <parameter key="payment_gateway.adapter.paypal.token">API_TOKEN</parameter>
        <parameter key="payment_gateway.adapter.authorize_net.config" type="collection">
            <parameter key="username">API_USERNAME</parameter>
            <parameter key="token">API_TOKEN</parameter>
            <parameter key="version">V2</parameter>
        </parameter>
    </parameters>
    <services>
        <service id="payment_gateway.adapter.paypal" class="MyCompany\Component\Payment\Gateway\Adapter\Paypal">
            <argument>%payment_gateway.adapter.paypal.username%</argument>
            <argument>%payment_gateway.adapter.paypal.token%</argument>
        </service>
        <service id="payment_gateway.adapter.authorize_net" class="MyCompany\Component\Payment\Gateway\Adapter\AuthorizeNet">
            <argument>%payment_gateway.adapter.authorize_net.config%</argument>
        </service>
        <service id="payment_gateway" class="MyCompany\Component\Payment\Gateway">
            <call method="setAdapter">
                <argument>paypal</argument>
                <argument type="service" id="payment_gateway.adapter.paypal" />
            </call>
            <call method="setAdapter">
                <argument>authorize_net</argument>
                <argument type="service" id="payment_gateway.adapter.authorize_net" />
            </call>
        </service>
    </services>
</container>

I personally find it very readable.

During the container instantiation, the XmlFileLoader takes the above-mentioned services.xml file and transforms it into PHP code, which looks similar to the following pseudo-code:

1
2
3
4
5
6
7
8
9
10
11
12
13
14
15
16
17
18
19
20
21
22
23
24
25
26
27
28
29
<?php

use Symfony\Component\DependencyInjection\Container;

$container = new Container();

$container->setParameter('payment_gateway.adapter.paypal.username', 'API_USERNAME');
$container->setParameter('payment_gateway.adapter.paypal.token', 'API_TOKEN');
$container->setParameter('payment_gateway.adapter.authorize_net.config', array(
    'username' => 'API_USERNAME',
    'token'    => 'API_TOKEN',
    'version'  => 'V2',
));

$paypal = new \MyCompany\Component\Payment\Gateway\Adapter\Paypal(
    $container->getParameter('payment_gateway.adapter.paypal.username'),
    $container->getParameter('payment_gateway.adapter.paypal.token')
);
$container->setService('payment_gateway.adapter.paypal', $paypal);

$authorizeNet = new \MyCompany\Component\Payment\Gateway\Adapter\AuthorizeNet(
    $container->getParameter('payment_gateway.adapter.authorize_net.config')
);
$container->setService('payment_gateway.adapter.authorize_net', $authorizeNet);

$gateway = new \MyCompany\Component\Payment\Gateway();
$gateway->setAdapter('paypal', $container->getService('payment_gateway.adapter.paypal'));
$gateway->setAdapter('authorize_net', $container->getService('payment_gateway.adapter.authorize_net'));
$container->setService('payment_gateway', $gateway);

Now you have sort of a bird-eye view of how your objects are built and interact all in one place. No need to open some bootstrap file to see how everything gets wired together, and most importantly, no need to touch your code in order to change how things get wired together. Ideally, we want application to be able to perform completely different tasks, just by re-arranging some dependencies.

note All of your DI xml (or yaml or php) configurations need to live under <bundle name>/Resources/config directory of your application, in our example, I would store the configuration in MyCompany/PaymentBundle/Resources/config/services.xml.

The next step is to let your Symfony2 application know that you have this service configuration and want it to be included in the main application container. The way you do it is very conventional, although I know at least one way to make it configurable, but that’s a different topic and deserves its own blog post.

In order to include your custom configuration, you usually need to create something called Dependency Injection Extension. A DI Extension is a class, that lives under <bundle name>/DependencyInjection directory, that implements Symfony\Component\DependencyInjection\Extension\ExtensionInterface and which name is suffixed with Extension.

Inside that class, you need to implement four methods:

  • public function load($tag, array $config, ContainerBuilder $configuration);
  • public function getNamespace();
  • public function getXsdValidationBasePath();
  • public function getAlias();

Or you could choose to extend Symfony\Component\DependencyInjection\Extension\Extension and have to worry only about the last three.

Let’s look at an example extension, that would register our services.xml configuration file with Symfony2’s DIC:

1
2
3
4
5
6
7
8
9
10
11
12
13
14
15
16
17
18
19
20
21
22
23
24
25
26
27
28
29
30
31
32
33
34
35
36
37
38
39
40
41
42
43
44
45
46
47
48
49
50
51
52
53
54
55
56
57
58
59
60
61
62
63
64
65
66
67
68
69
70
71
72
73
<?php

namespace MyCompany\Bundle\PaymentBundle\DependencyInjection;

use Symfony\Component\DependencyInjection\Extension\Extension;
use Symfony\Component\DependencyInjection\ContainerBuilder;

class PaymentExtension extends Extension
{
    /**
     * Loads the services based on your application configuration.
     * The full configuration is as follows:
     *
     * payment.config:
     *   paypal:
     *     username: email@domain.com
     *     token:    XXXXX-XXXXX-XXX-X
     *   authorize_net:
     *     config:
     *       username: email@domain.com
     *       token:    XXXXXX-XXXXX-XXX-X
     *       version:  V2
     *
     * @param mixed $config
     */
    public function configLoad($config, ContainerBuilder $container)
    {
        if (!$container->hasDefinition('payment_gateway')) {
            $loader = new XmlFileLoader($container, __DIR__.'/../Resources/config');
            $loader->load('services.xml');
        }
        if (isset($config['paypal'])) {
            foreach (array('username', 'token') as $key) {
                if (isset($config['paypal'][$key]) {
                    $container->setParameter('payment_gateway.adapter.paypal.'.$key, $config['paypal'][$key]);
                }
            }
        }
        if (isset($config['authorize_net']['config'])) {
            $parameters = $container->getParameter('payment_gateway.adapter.authorize_net.config');
            foreach (array('username', 'token', 'version') as $key) {
                if (isset($config['authorize_net']['config'][$key])) {
                    $parameters[$key] = $config['authorize_net']['config'][$key];
                }
            }
            $container->setParameter('payment_gateway.adapter.authorize_net.config', $parameters);
        }
    }

    /**
     * @inheritDoc
     */
    public function getXsdValidationBasePath()
    {
        return __DIR__.'/../Resources/config/schema';
    }

    /**
     * @inheritDoc
     */
    public function getNamespace()
    {
        return 'http://avalanche123.com/schema/dic/payment';
    }

    /**
     * @inheritDoc
     */
    public function getAlias()
    {
        return 'payment';
    }
}

This extension does several things:

  • It will include the services.xml into DIC only if payment_gateway service is not yet defined - this is to avoid conflicts and lazy-load the configuration.
  • It will override some of default parameters, if you specify your own when enabling the extension.
  • It also provides the XSD schema location and base path for validation of XML configuration.

After you created the extension, all you need to do is add PaymentBundle to the application Kernel::registerBundles() method’s returned array. Then in the application configuration file specif something like payment.config: ~& (assuming you’re using yaml configs). That should do it, you should now be able to call $container->getService('payment_gateway') and get the fully set up instance of Gateway.

Happy Coding!